SmartOS overview
Why Smartos? #
There are many hypervisors on the market, from VMware’s ESXi to Citrix XenServer, but they’re not a very good match for a standalone Hypervisor because they are architectured and built to be deployed in a clustered/distributed manner with infrastructure services distributed across the datacenter.
Because some time ago we decided to deploy in our company an all-in-one solution, we looked some alternatives up on the internet and came accross Joyent’s SmartOS
SmartOS is an Illumos (which is an OpenSolaris 11 based) based distribution engineered by Joyent which provides a very unique feature set:
- Solaris Zones for LightWeight virtualization or OS virtualization.
- KVM for Virtual Machine virtualization
- ZFS File System
- DTrace for advanced OS Performance troubleshooting.
- Service Management Facility (SMF) for Service handling
What We really liked was the SMF + ZFS + KVM + Solaris Zones combination, because it would provide a better all-in-one solution all around (At that time Docker was not so widespread).
This deployment would cover an office environment (DHCP service, Inventory Service, Log aggregation and monitoring solution) and allow some growth into our infrastucture
Feature Overview #
Solaris Zones #
Solaris Zones have been around since Solaris 10 (2005); they provide an Operating System level virtualization, which is a kind of server virtualization where the Kernel of the Operating System allows multiple user space instances instead of just one. Those instances are usually called Containers, Jails, Zones or VPS and may look server-alike for the end user or owner.
This form of virtualization imposes little or no overhead at all, because many of the Host’s operating System features are offered to the user spaces like operating system’s normal system call interface and don’t need to run an intermediate layer to translate those instructions.
KVM #
KVM is a virtualization infrastructure for the Linux Kernel. KVM requires a processor with a hardware virtualization extension such as Intel VT-X or AMD-V. By itself, KVM does not perform any emulation. Instead, it simply exposes the /dev/kvm interface, with which a user space host can then:
- Set up the guest VM’s address space. The host must also supply a firmware image (usually a custom BIOS when emulating PCs) with which the guest can bootstrap into its main OS.
- Feed the guest simulated I/O.
- Map the guest’s video display back onto the host. On Linux, QEMU versions 0.10.1 and later is one such userspace host. QEMU will use KVM when available to virtualize guests at near-native speeds, but otherwise will fall back to software-only emulation. Internally, KVM uses SeaBIOS as an open source implementation of a 16-bit x86 BIOS.
ZFS #
ZFS is a combined file system and logical volume manager designed by Sun Microsystems. The features of ZFS include protection against data corruption, support for high storage capacities, efficient data compression, integration of the concepts of filesystem and volume management, snapshots and copy-on-write clones, continuous integrity checking and automatic repair, RAID-Z, ZFS cache and native NFSv4 ACLs.
Service Management Facility #
Service Management Facility (SMF) is a feature of the Solaris operating system that creates a supported, unified model for services and service management on each Solaris system and replaces init.d scripts. SMF introduces:
- Dependency order: Services sometimes depend on one another for proper operation, and a robust system should know each service’s dependencies. If an underlying service fails, it needs to be corrected before other services that depend upon it are affected.
- Configurable boot verbosity
- Delegation of tasks to non-root users. A service can be configured to run within a limited set of privileges, rather than as the all-powerful root user. If a service has been compromised, the amount of damage that can be inflicted by the intruder will be minimized if the service’s power is constrained to that of a more limited user.
- Parallel starting of services. Which speeds up the boot process by starting multiple services simultaneously; allowing idle CPU time resulting from a service that is temporarily blocked to be relinquished for use by other services that can start independently of the blocked service.
- Automatic service restart after failure. Works in conjunction with the Solaris Fault Manager, allowing software recovery in the event of hardware faults (cpu, memory), admin error such as accidental kills, and software core dumps.
- Service definition (called Manifests) in XML format: Services are defined in an XML file, which is later imported to the Service Management Facility using the svcfg import manifest.xml command. Manifests contain the following information:
- Service name: Name of the service
- Type: Usually service
- Version: Version of the manifest
- Dependencies: Services that are required before running this service
- Exec method: Actual execution of the binary file
- Configuration: Configuration file to be passed to the binary (optional)
All these capabilities are made possible by treating Services as “first class objects”. That is, they are more than just user-executed software to the OS. They can be defined to have special states that allow finer control and permit monitoring and probing for diagnosing software failures, rather than having the administrator or dedicated “restarter” modules kill and restart the service as before.
ZFS Deduplication #
Deduplication is the process of eliminating duplicate copies of data. Dedup is generally either file-level, block-level, or byte-level. Chunks of data – files, blocks, or byte ranges – are check summed using some hash function that uniquely identifies data with very high probability.
Chunks of data are remembered in a table of some sort that maps the data’s checksum to its storage location and reference count. When you store another copy of existing data, instead of allocating new space on disk, the dedup code just increments the reference count on the existing data. When data is highly replicated, which is typical of backup servers, virtual machine images, and source code repositories, deduplication can reduce space consumption not just by percentages, but by multiples.
In other words, data deduplication means saving disk space when you have the same data stored multiple times in your disk. Deduplication is particularly useful when coupled with VMs
ZFS Cache #
ZFS uses different layers of disk cache to speed up read and write operations. Ideally, all data should be stored in RAM, but that is too expensive. Therefore, data is automatically cached in a hierarchy to optimize performance vs cost. Frequently accessed data is stored in RAM, and less frequently accessed data can be stored on slower media, such as SSD disks. Data that is not often accessed is not cached and left on the slow hard drives. If old data is suddenly read a lot, ZFS will automatically move it to SSD disks or to RAM.
The first level of disk cache is RAM, which uses a variant of the ARC algorithm. It is similar to a level 1 CPU cache. RAM will always be used for caching, thus this level is always present. There are claims that ZFS servers must have huge amounts of RAM, but that is not true. It is a misinterpretation of the desire to have large ARC disk caches. The ARC is very clever and efficient, which means disks will often not be touched at all, provided the ARC size is sufficiently large. In the worst case, if the RAM size is very small (say, 1 GB), there will hardly be any ARC at all; in this case, ZFS always needs to reach for the disks. This means read performance degrades to disk speed.
The second level of disk cache is SSD disks. This level is optional, and is easy to add or remove during live usage, as there is no need to shut down the zpool. There are two different caches; one cache for reads, and one for writes.
The read SSD cache is called L2ARC and is similar to a level 2 CPU cache. The L2ARC will also considerably speed up Deduplication if the entire Dedup table can be cached in L2ARC. It can take several hours to fully populate the L2ARC (before it has decided which data are “hot” and should be cached). If the L2ARC device is lost, all reads will go out to the disks which slows down performance, but nothing else will happen (no data will be lost).
The write SSD cache is called the Log Device, and it is used by the ZIL (ZFS intent log). ZIL basically turns synchronous writes into asynchronous writes, which helps e.g. NFS or databases.[34] All data is written to the ZIL like a journal log, but only read after a crash. Thus, the ZIL data is normally never read. Every once in a while, the ZIL will flush the data to the zpool; this is called Transaction Group Commit. In case there is no separate log device added to the zpool, a part of the zpool will automatically be used as ZIL, thus there is always a ZIL on every zpool. It is important that the log device use a disk with low latency. For superior performance, a disk consisting of battery backed up RAM such as the ZeusRAM should be used. Because the log device is written too often, an SSD disk will eventually be worn out, but a RAM disk will not. If the log device is lost, it is possible to lose the latest writes, therefore the log device should be mirrored. In earlier versions of ZFS, loss of the log device could result in loss of the entire zpool, therefore one should upgrade ZFS if planning to use a separate log device.

Architecture Overview #
SmartOS as is based on Solaris uses the SMF approach for managing services (the same way that Ubuntu uses upstart to manage services). When building SmartOS, Joyent took the same approach as VMware’s for its ESXi product; having a very small OS fingerprint that runs entirely from RAM memory (that is why it has to be small), with pre-built ISO / PXE Images for an easy upgradeable host system. That means that the SmartOS (Global Zone) host will have the majority of folders mounted in Read Only (RO) mode, and just a few which are writable and persistent.
The read-only nature of the global zone means that if you want to make changes to the global zone, then they need to be read from permanent storage, rather than making changes as you would normally.
SmartOS creates a /usbkey file system on stable storage which holds configuration for the global zone, and an init script /lib/svc/method/smartdc-config which sources the file /usbkey/config for configuration details. By default this will mostly include details you provided at install time; however there are additional values you can set to customise the global zone further. The /usbkey/config will usually contain:
- Network configuration
- NTP configuration
- Root authorized keys for public key authentication rather than password (located in /usbkey/config.inc/authorized_keys)
The only change-persistent directories in SmartOS are:
- /zones: Where your zones / VMs will be saved, it will mainly contain UUIDs which are zone identifiers and some predefined folders:
- global: contains some information about the global zone
- lastbooted: contains the timestamp of the last image that was booted from /usbkey
- currbooted: contains the timestamp of the current boot image from /usbkey
- manifests: Contains base manifests(SMF) for Joyent and Joyent-minimal zones
- /opt: Where new packages, configurations, etc will be installed
- /opt/local: It’s the writable root filesystem, here you will find etc, bin, lib, sbin, share, […] which persist data changes. Packages installed in the global zone will be installed in /opt/local/bin and configurations will be installed in /opt/local/etc.
- /var: Where logs, package database, etc will be saved.
All the other folders are not change-persistent, so if you store data in the /root folder and the server is restarted, you will lose that data forever.
Linux will show those folders mounted in the / point, and that is true, but in reality the persistent folders are contained in a ZFS pool, which is created the first time you boot SmartOS. You can take a look at the ZFS pools with the zpool list command.
SmartOS can either, run native Solaris Zones, or run KVM instances or Virtual Machines, but the way it controls VMs is completely different to the Solaris approach. It is based on the principle that Virtual Machines are created from images available from the Joyent public repository, but you can also create new base images from existing Virtual Machines, add custom source repositories and, even run your own repository. To enforce that workflow, Joyent created custom binaries written in node.js which are wrappers for the native Solaris binaries; vmadm and imgadm among others.
imgadm #
The imgadm tool allows you to interact with virtual machine images on a SmartOS system. Virtual machine images (also sometimes referred to as ‘datasets’) are snapshots of pre-installed virtual machines which are prepared for generic and repeated deployments.
Virtual machine images are made up of two primary components: A compressed ZFS snapshot, and a manifest (metadata) which describes the contents of that file. A ZFS snapshot may be of either a ZFS file system (for OS-level virtual machines, a.k.a. zones), or a ZFS zvol (for KVM virtual machines). The manifest is a JSON serialized description. The identifier for an Image is its UUID. Most commands operate on Images by UUID.
imgadm is the responsible for :
- Downloading images from the specified source
- Listing local images
- Importing offline images
- Inspecting images
- Creating images from existing VMs
- Publishing images to an image repository
vmadmd #
The vmadm tool allows you to interact with virtual machines on a SmartOS system. All 3 of: OS Virtual Machines (SmartOS zones), LX Virtual Machines and KVM Virtual Machines can be managed. vmadm allows you to create, inspect, modify and delete virtual machines on the local system.
The primary reference for a VM is its UUID. Most commands operate on VMs by UUID. In SmartOS, there are included bash tab-completion rules so that you can tab-complete UUIDs rather than having to type them out for every command.
Network configuration #
SmartOS network configuration is primarily taken care in the /usbkey/config file, but you can query the network intefaces with the dladm command. Physical network intefaces are assigned tags and then, zones are bound to the specified physical interfaces specifying that tag. By default the SmartOS startup configuration script will assign the “admin” value to the interface it is selected and configured. Tags are given setting up the desired interface as TAG_nic=value, TAG_ip=value, etc.
[root@smartos ~]# grep admin /usbkey/config
# admin_nic is the nic admin_ip will be connected to for headnode zones.
admin_nic=9c:b6:54:bb:c3:3c
admin_ip=192.168.1.3
admin_netmask=255.255.255.0
admin_network=...
admin_gateway=192.168.1.3
pkgin - Package Management #
SmartOS ships the pkgin package management utility which relies on the pkgsrc binary packages used in various UNIX systems such as NetBSD, AIX, HP-UX, Illumos, etc.
Pkgin is very much like apt or yum for Linux, it also has an internal database to keep track of the installed packages on the Operating System. For more information on the pkgin command, go to the commands section.
SmartOS Zones overview #
SmartOS zones are created using an image template and a json file containing the final zone metadata such as Network configuration, zone name, post installation scripts, ssh keys, etc. SmartOS zones are easily recognizable using the vmadm list command which will always show the VM type:
[root@smartos ~]# vmadm list
UUID                                    TYPE    RAM  STATE       ALIAS
2321c688-e15e-4c6f-bc07-b2f7ff772c18    OS      64   running     DHCP
153831fc-2af9-44c8-9ba5-fad507337cc2    OS      256  running     samba
024ab643-ed65-48ab-95f8-5e5976539bfa    OS      1024 running     powerdns
3d6d023b-50f0-42e1-9a84-e1c558c16224    OS      1024 running     MySQL-PerconaDB
4cda7281-45e1-4485-8648-848f7211c938    KVM     1024 running     OCS Inventory NG
6a9d35d3-d522-4310-a724-fc38c59cd7e5    KVM     1024 running     elk
If we inspect an OS instance with the vmadm get command, it will show all of the running zone metadata:
[root@smartos ~]# vmadm get 2321c688-e15e-4c6f-bc07-b2f7ff772c18
{
  "zonename": "2321c688-e15e-4c6f-bc07-b2f7ff772c18",
  "autoboot": true,
  "brand": "joyent",
...
We can see that the brand key has the “joyent” value, thus indicating that the VM is in fact a SmartOS zone. We can also lookup specific values with the json command, as it is stored in that format.
If we inspect a KVM zone it will show the “kvm” value in brand:
[root@smartos ~]# vmadm get 6a9d35d3-d522-4310-a724-fc38c59cd7e5  | json brand
kvm
[root@smartos ~]# vmadm info 6a9d35d3-d522-4310-a724-fc38c59cd7e5 | json version
{
  "qemu": {
    "micro": 1,
    "minor": 14,
    "major": 0
  },
  "package": " (qemu-kvm-devel)"
}
KVM instances #
Because SmartOS is an Illumos fork, thus a Solaris relative, it does not have KVM capability by default on the kernel, but Joyent did a fantastic job and added KVM capability on the SmartOS kernel. The only “drawback” is that every Linux instance you launch will have 1024 MB of overhead, even if the VM is not using that amount of memory.
Creating datasets #
Datasets can be created by hand (vi, nano, or your preferred editor) or from a rather comfortable web interface free of charge and available for everyone’s use called datasets.at
SmartOS Zones architecture #
Zone creation workflow: #
- Create JSON manifest with the zone metadata such as Network information, host name, ssh keys, zone alias, brand, etc.
- Issue the vmadm create –f manifest.json command which will: a. Clone the source image from which the zone is created and generate a new UUID for the zone and set up the specified disk quota for the zone. b. Bind the global zone shared folders to the new zone. c. Execute hooks to set up the zone with the metadata specified in the JSON manifest. d. Execute the specified user-scripts in the zone. When a new zone is created from a JSON manifest with the vmadm create –f manifest.js command, internally vmadm will trigger the zfs clone command, which will clone the data from the source image from which the zone is created, to a new location with a randomly generated UUID, for example; if we issue the zpool history command and grep the UUID of an existing zone, we will see that happening:
[root@smartos ~]# zpool history| grep 2321c688-e15e-4c6f-bc07-b2f7ff772c18
zfs clone -F -o quota=5g zones/UUID@final zones/2321c688-e15e-4c6f-bc07-b2f7ff772c18
zfs create -o quota=102400m -o mountpoint=/zones/2321c688-e15e-4c6f-bc07-b2f7ff772c18/cores zones/cores/2321c688-e15e-4c6f-bc07-b2f7ff772c18
The UUID@final part means that it will copy the last ZFS snapshot, as the ZFS file system supports snapshotting, we would get the same output if fore every zone created in the SmartOS host.
Then, the host will share some of its binaries and libraries, specifically /usr and /lib, so the zone will have most of the global zone binaries and libraries to reduce each zone overhead.

SmartOS Storage #
The SmartOS host was configured with just one zpool (vdev) called zones, which is mounted in the /zones directory on the global zone. The zpool is set up as a logical mirror on top of two 500GB 7.2k RPM SATA drives. In this case we chose the logical mirror over the hardware mirror, for all the added value that ZFS provides us with, it can handle the mirror in a more efficient manner than the rather feature lacking raid card from HP.
The ZFS pool zones was created enabling data deduplication as we will see savings because we’re storing Virtual machines and there are a lot of blocks which will contain the same information across the disks, and to enhance that deduplication we also enabled a compression layer on top with the very CPU light but effective lzjb.
All the persistent data will be inside that zones zpool and it will compress and dedup all the data. Furthermore, because ZFS uses an Adaptative Replacement Cache for the reads and a ZFS Intent log for the writes, it will deliver a very good disk Input Output performance.
The only drawback of ZFS is that it has to be scrubbed on a regular basis to identify data integrity problems, silent data corruptions caused by transient hardware issues, and early alerts of disk failures.

SmartOS Networking #
SmartOS also provides network virtualization to the its zones, it does that using the crossbow component of the Illumos kernel. Crossbow provides the building blocks for network virtualization and resource control by creating virtual stacks around any service (HTTP, HTTPS, FTP, NFS, etc.), protocol (TCP, UDP, SCTP, etc.), or Virtual machines like Containers, Xen and ldoms.
Crossbow allows the system administrator to carve out any physical NIC into multiple virtual NICs which are pretty similar to real NICs and are administered just like real NICs. Each Virtual NIC can be assigned its own priority and band-width on a shared NIC without causing any performance degradation.
The virtual NICs can have their own NIC hardware resources (Rx/Tx rings, DMA channels), MAC addresses, kernel threads and queues which are private to the VNIC and are not shared accross all traffic. In case of Solaris Containers, the Container can be assigned a virtual Stack Instance as well along with one or more virtual NICs. As such traffic for one VNIC can be totally isolated from other traffic and assigned any kind of limits or guarantees on amount of bandwidth it can use.
Physical NICs are assigned tags which then, are used when assigning a virtual NIC to a physical link. In our case the primary nic is assigned a tag of “admin” so all of the zones that have networking enabled will have to be mapped to the admin nic
[root@smartos]# sysinfo | json "Network Interfaces" | json -o json-0 bge0
{"MAC Address":"9c:b6:54:bb:c3:3c","ip4addr":"192.168.1.3","Link Status":"up","NIC Names":["admin"]}
dladm is a command which is primarily used to create, modify and destroy VNIC based on mac or IP addresses. The created VNIC is visible and managed by ifconfig just like any other NIC and can get its IP address assigned via DHCP if necessary
[root@smartos]# dladm show-vnic
LINK    OVER    SPEED   MACADDRESS    MACTYPE   VID    ZONE
net1    bge0    0   72:9b:a3:cb:84:e5   fixed   0   2321c688-e15e-4c6f-bc07-b2f7ff772c18
net0    bge0    0   72:e4:dc:7c:a9:2    fixed   0   153831fc-2af9-44c8-9ba5-fad507337cc2
net0    bge0    0   a2:39:d4:aa:c1:c9   fixed   0   024ab643-ed65-48ab-95f8-5e5976539bfa
net0    bge0    0   82:27:ad:11:2a:35   fixed   0   3d6d023b-50f0-42e1-9a84-e1c558c16224
net0    bge0    0   52:6d:c3:f3:af:40   fixed   0   4cda7281-45e1-4485-8648-848f7211c938
net0    bge0    0   42:41:58:2d:fa:8c   fixed   0   6a9d35d3-d522-4310-a724-fc38c59cd7e5

Zone Break-up #
Common processes #
There are some shared processes accross zones and KVM instances:
- sshd: all the VMs come with the SSH Daemon enabled with a public-private key pair enabled for login.
- beaver: all the Virtual Machines but the DHCP VM have a beaver agent which is responsible of shipping the specified logs in the beaver configuration file to the Logstash log collector (port 2120/tcp). The beaver agent is written in python and uses the ZeroMQ (ØMQ) over TCP.
- nrsysmond: Agent responsible of reporting the state of the Operating System on which it is installed to the New Relic collector host (port 80/tcp).
Global #
The global zone is the responsible for resource management, zone management, and all of the other Hypervisor tasks. The Global zone has 3 important processes regarding virtualization:
- vmadmd: daemon responsible of handling vmadm commands.
- zoneadmd: daemon responsible of handling zonecfg and zoneadm commands
- zpool-zones: daemon responsible of files system I/O Metrics and statistics

We also have the configuration for the beaver daemon Which watches the /var/log/backup.log file very much like a tail –f command:
[root@smartos]# cat /opt/custom/etc/beaver/conf
# /opt/custom/etc/beaver/conf
[beaver]
transport: zmq
zeromq_address: tcp://192.168.1.7:2120
logstash_version: 1
# VM Backup logs
[/var/log/backup.log]
type: backup
tags: info
The host has a root crontab in place which:
- Backs up all of the Virtual machines in the host and puts them in an Amazon S3 bucket
- Checks that the backups have been made and rotates them if they have been correctly uploaded.
- ZFS pool maintenance task to scrub the zpool zones so it can detect failures and repair them if any are found.
[root@smartos]# crontab -l root
# Task to back up all the VMs in the SmartOS host and put them in Amazon S3
0 23 * * 1 /opt/custom/cron/backup.sh fullbackup >> /var/log/backup.log
# Clean the backup folder
0 23 * * 0 /opt/custom/cron/backup.sh rotate >> /var/log/backup.log
# ZFS Maintenance tasks
0 4 * * 0 /usr/sbin/zpool scrub zones
Directory Layout #
[root@smartos /opt]# tree /opt/ -L 1
/opt/
├── backup # Folder that contains the backups until they are rotated
├── custom # See next table
├── local # contains persistent OS data, binaries and configurations
├── opt # Miscellaneous
├── packages # Folder used by pkgin to store cache of packages
├── restore # Folder used by the restore.sh script to restore virtual machines from Amazon S3
└── uncheckedbacks # Folder used to keep unchecked backup files.

[root@smartos /opt/custom]# tree
├── bin # Contains custom scripts used by SMF manifests
│   └── postboot
├── cron # Contains scripts used by the crontab
│   ├── backup.sh
│   └── restore.sh
├── etc # Contains custom configurations
│   ├── beaver
│   │   └── conf
│   └── nodename
├── images # Images that can be imported into imgadm
│   ├── pdns.js
│   ├── powerdns.js
│   ├── rails.0.1
│        ├── rails.0.1.dsmanifest
│        ├── rails.0.1.zfs.gz
│        └── uuid-rails.0.1.txt
├── install.sh
├── s3cfgurl.txt # Contains the cfgurl for the backup script to download the .s3cfg
└── smf # Contains SMF Manifests
    ├── beaver.xml
    └── postboot.xml
PowerDNS #
The PowerDNS zone is responsible of resolving the ZONE.local querying a MySQL database and forwarding other zone’s queries to a forwarder set up in the /etc/pdns.conf which is a symbolic link to /opt/local/etc/pdns.conf.

pdns_server #
This Zone relies on a PowerDNS daemon running as pdns_server which has the following configuration
[root@smartos]# cat /etc/pdns.conf
allow-axfr-ips=127.0.0.1 # Allows zone transfers only from the localhost
allow-recursion=0.0.0.0/0 # allows recursion over all networks
config-dir=/opt/local/etc
daemon=yes # sets the executable as a daemon

launch=gmysql # MySQL database information
gmysql-host=SOMEIP
gmysql-user=pdns
gmysql-dbname=pdns
gmysql-password=*****************************

local-address=0.0.0.0 # Listens on all interfaces
local-port=53 # listen to 53/TCP and 53/UDP

log-dns-details=no # Logging details
log-dns-queries=no
log-failed-updates=yes
logging-facility=0
loglevel=9 # Maximum logging detail

recursor=8.8.8.8 # sets the DNS to google’s public DNS
setgid=60001 # sets the Group ID for the process as nobody
setuid=60001 # sets the User ID for the process as nobody

webserver=yes # Enables webserver in port 8080 to see server statistics
webserver-address=0.0.0.0
webserver-password=***************
The logging facility Syslog logs the PowerDNS output to:
- Error: logs the errors on /var/log/pdns.err
- Warning: logs the warnings on /var/log/pdns.warn
- Information: logs the informational logs on /var/log/pdns.info
Extra components #
This zone has an Nginx daemon running as a PowerDNS front end to manage the PowerDNS zones stored in MySQL as records. It uses a Ruby on Rails front end to manage the PowerDNS records. Because Nginx has no built-in Ruby on Rails support it uses the Passenger’s plugin from Phusion to compile and run Ruby code:
- Nginx version 1.6.0 compiled from source installed from phusion passenger’s installer
- Phusion Passenger version 4.0.41 compiled from source
- Ruby version 2.0.0p353 installed from pkgin
- PowerDNS on Rails frontend located on /apps/powerdns-on-rails connecting to the MySQL database powerdns. The database configuration is located in /apps/powerdns-on-rails/config/database.yml
Nginx #
Nginx is a lightweight web server that is becoming increasingly popular. It is known to be smaller, lighter weight and more scalable than Apache thanks to its evented I/O architecture. That said, Nginx is less flexible than Apache. For example it has no dynamic module system: all modules must be statically compiled into Nginx.
[root@smartos]# cat /etc/nginx.conf
user nobody; # sets the user to be used to run the Nginx worker processes (the master will be run by root)
worker_processes  auto; # Autodetect how many worker processes the Nginx server will have

events {
    worker_connections  1024; # maximum connections that the worker can handle simultaneously
}
http {
    # Global Nginx environment
    passenger_root /opt/local/lib/ruby/gems/2.0.0/gems/passenger-4.0.41;
    passenger_ruby /opt/local/bin/ruby200;

    include       mime.types;
    default_type  application/octet-stream;

    sendfile        on;
    keepalive_timeout  65;

    server {
        listen       80; # Listens on port 80
        root /apps/powerdns-on-rails/public; # Sets the root directory for the web application
        passenger_enabled on; # Enables passenger for this virtual host

    }
}
Basically, the Nginx master process will spawn 4 worker sub-processes (because Nginx will detect that we have 4 CPUs available, thus the most efficient setup would be to spawn 4 worker processes) and will also spawn a PassengerWatchdog process which in turn will spawn two sub-processes (PassengerLoggingAgent and PassengerHelperAgent). The architecture will look like this:
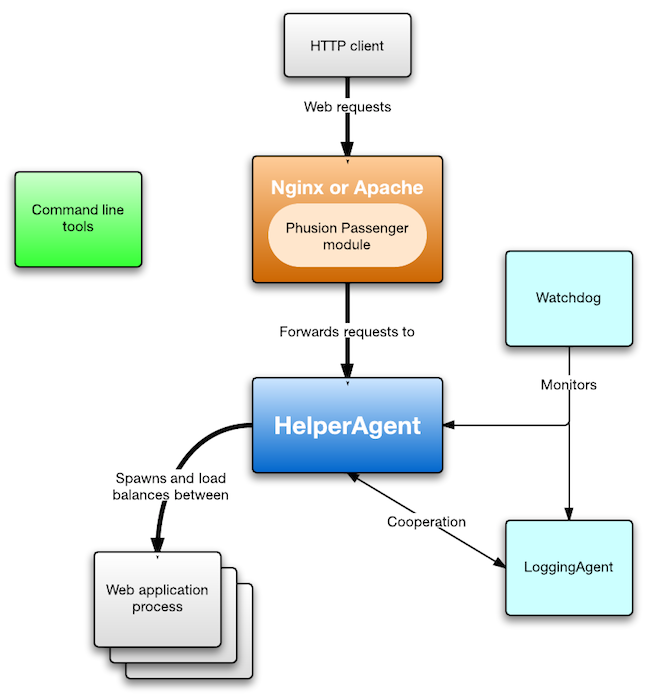
And, from a process hierarchy standpoint:
`-  /opt/local/nginx/sbin/nginx -c /opt/local/nginx/conf/nginx.conf
|   `-  /opt/local/nginx/sbin/nginx -c /opt/local/nginx/conf/nginx.conf
|   `-  /opt/local/nginx/sbin/nginx -c /opt/local/nginx/conf/nginx.conf
|   `-  /opt/local/nginx/sbin/nginx -c /opt/local/nginx/conf/nginx.conf
|   `-  /opt/local/nginx/sbin/nginx -c /opt/local/nginx/conf/nginx.conf
`-  PassengerWatchdog
|   `-  PassengerHelperAgent
|   `-  PassengerLoggingAgent
Beaver #
The beaver agent monitors 4 files on this server:
- /var/log/pdns.err: Logs the pdns_server daemon errors
- /var/log/pdns.warn: Logs the pdns_server daemon warnings
- /var/log/access.log: Logs the accesses to the PowerDNS on Rails web application
- /var/log/error.log: Logs the Nginx / Passenger errors
MySQL #
The MySQL zone acts as the primary database for the OCS Inventory NG zone and the PowerDNS zone. It has a MySQL Server package installed with the Percona add-ons. It contains 2 databases:
- ocs: Contains all the OCS Inventory NG inventory database.
- pdns: Contains all the ZONE.local zone entries

mysqld #
The MySQL daemon listens on all interfaces on port 3306, and reads the configuration file from /opt/local/etc/my.cnf although a symbolic link has been created on /etc/my.cnf.
[root@smartos]# cat /opt/local/etc/my.cnf
[client] # Configuration for the mysql command when trying to connect to the server
port            = 3306
socket          = /tmp/mysql.sock # By default it will connect to the msyqld daemon by UNIX socket
default-character-set = utf8

# The MySQL server
[mysqld]
user = mysql # user that runs the mysqld daemon
port = 3306 # port to use for the mysqld daemon
basedir = /opt/local # base directory for configuration e.g. /opt/local/etc/my.cnf
datadir = /var/mysql # directory on which store data
socket = /tmp/mysql.sock # UNIX socket to use
bind-address = 0.0.0.0 # mysqld daemon will bind to that address
default-storage-engine = innodb # default storage engine to use
character-set-server = utf8 # default charset
skip-external-locking # don’t lock MyISAM tables
log_warnings # log all the warnings
skip_name_resolve # Skip DNS resolution
Beaver #
The beaver agent monitors 2 files on this server:
- /var/log/mysql/error.log: Logs the mysqld daemon errors
- /var/log/mysql/slowquery.log: Logs the mysqld daemon slow queries
OCS Inventory NG #
The OCS Inventory NG zone is responsible of maintaining an up to date inventory of all the workstations. This zone is not an OS but rather a KVM zone which launches a QEMU instance. The OS is a CentOS 6.5 containing an Apache 2 web server with the mod_perl to run the OCS Inventory NG binaries.

Apache #
The httpd daemon is listening on the server for port 80 http requests. It has two virtual hosts running perl code through the mod_perl apache module:
- ocsreports: Web-UI to query and manage the OCS Inventory NG.
- ocsinventory: Virtual host to receive the inventory data from the network agents.
The Web-UI can be reached through a browser pointing to the URL: http://ocsinventory-ng/ocsreports

Beaver #
The beaver agent monitors 5 files on this server:
- /var/log/yum.log: Yum logs every change made in the Package DB
- /var/log/ocsinventory-server/activity.log: OCS Inventory activity log
- /var/log/secure: authentication log
- /var/log/httpd/error_log: Apache error log.
Elasticsearch-Logstash-Kibana (ELK) #
The ELK zone is responsible of processing all the logs that the other servers ship with the Beaver agent through the Logstash component, storing them in an Elasticsearch database and displaying the data in a Web-UI through an Nginx server using the Kibana component, which is just a JS interface that queries the Elasticsearch database.

Elasticsearch (java (ES)) #
Elasticsearch is an open source, distributed, real-time search and analytics engine built on top of the Apache Lucene retrieval library written in Java. Elasticsearch is also written in Java and stores all its information in JSON documents, it will be used to store log data in a Key: Value JSON format. Elasticsearch listens on 9200/tcp, 9300/tcp and 9001/tcp.
Logstash (java (LS)) #
logstash is an open source tool for managing events and logs. It can be used to collect, parse and store logs for later use. It’s used in conjunction with Elasticsearch and Kibana to get the full functionality of Logstash. Logstash currently listens on 2120 for ZMQ messages and outputs the logs in JSON format to the Elasticsearch datatbase
Kibana #
Kibana is a Front end that can be used to visualize logs and time-stamped data, works out of the box with Elasticsearch, logstash, apache flume, fluentd, etc… It connects directly to the Elasticsearch database. Kibana is deployed through an Nginx web server listening on port 80
Log flow diagram #

Log format #
All the logs are watched with “beaver” a binary written in python which watches the specified files in the beaver config file like the tail –f command, every written in a watched log file will make beaver send a Zero MQ message to the Logstash server listening on 2120/tcp. Logstash will process those events and apply any filters specified in the Logstash configuration file and convert the input event into a JSON formatted document. Then it will output the results to the Elasticsearch index database. Here is what a RAW JSON event looks like:
Sample Event

{
  "_index": "logstash-2014.07.22",
  "_type": "powerdns",
  "_id": "KYTUhC3NRySd90Gg4GSesg",
  "_score": null,
  "_source": {
    "tags": [
      "info"
    ],
    "@version": 1,
    "@timestamp": "2014-07-22T14:38:59.730Z",
    "host": "powerdns",
    "file": "/var/log/pdns.warn",
    "message": "Jul 22 16:38:59 powerdns pdns[1884]: [ID 702911 local0.warning] Recursive query for remote 192.168.1.11:1247 with internal id 2 was not answered by backend within timeout, reusing id",
    "type": "powerdns"
  },
  "sort": [
    1406039939730
  ]
}
Kibana Dashboard #
The kibana Dashboard lets you analyse all the logs that beaver agents ship to Logstash using the ZMQ protocol. You can filter, check historic logs, and even create your custom dashboards to query the Elasticsearch index database. The “Default” Dashboard includes all the events over time, with pie-like graphics on to filter events through the tags introduced in the ZMQ messages.

And… That’s pretty much about it…